When we talk about risk management in projects, we're really talking about the art of looking ahead. It's the process of spotting potential problems, figuring out how serious they are, and deciding what to do about them before they can wreck your project's timeline, budget, or quality. This isn’t about trying to dodge every single risk—that’s impossible. It's about being smart and prepared for the bumps in the road.
Why Risk Management Is Your Studio's Creative Insurance Policy
Don't think of risk management as some dull, bureaucratic exercise. It’s more like a creative insurance policy for your studio. Imagine an experienced film producer who already has a backup plan for when a key location suddenly becomes unavailable, or a lead designer who gets sick right before a deadline. That kind of foresight is what we’re aiming for.
This proactive approach is what protects your timelines, budgets, and—most importantly—your creative vision from the curveballs every project inevitably throws.
Trying to run a project without thinking about risks is like trying to sail a ship through a storm without a map. You’re inviting budget blowouts, missed deadlines, and a final product that just isn’t what it should be. The industry is catching on, too. The global risk management market is predicted to hit £41 billion by 2032, which tells you one thing loud and clear: successful studios are making structured risk management a core part of how they operate.

A Framework for Proactive Problem-Solving
At its heart, risk management gives you a structured way to ask, "What could go wrong?" For a creative studio, the answers are endless: technical glitches during a render, a key piece of software failing, or unexpected client feedback that throws a whole phase into chaos.
The entire point is to shift from reactive "firefighting" to a proactive state of control. When you systematically think through what might happen, you give your team the power to create solid backup plans long before they’re scrambling to fix something.
A risk is a potential future problem, while an issue is a problem happening right now. Effective risk management focuses on addressing risks before they become issues, saving immense time, money, and stress.
This whole approach is built around a simple but powerful lifecycle. Each step builds on the last, creating a solid safety net for your creative work. The key stages look like this:
- Identification: Getting the team together to brainstorm and list out every potential hurdle, big or small.
- Assessment: Looking at each risk and judging how likely it is to happen and how much damage it could do.
- Mitigation: Coming up with real, actionable plans to either avoid the risk, lessen its impact, or have a fallback ready.
- Monitoring: Keeping a constant eye on your identified risks, ready to adjust your plans as the project evolves.
By adopting this mindset, you’re not just making lists for the sake of it. You’re building a culture of awareness and preparedness that protects your studio's reputation and, ultimately, its bottom line.
The Six Stages of Effective Project Risk Management
Proper risk management isn't a one-and-done task you tick off a list. It's a living, breathing cycle that keeps your projects healthy from start to finish. Think of it less like a rigid instruction manual and more like a flexible workflow that moves and adapts with your project.
Breaking it down into six distinct stages helps build a solid system that empowers your team to get ahead of problems, not just firefight them when they explode. This cycle makes sure that any potential threat is spotted, understood, dealt with, and watched from kickoff to final delivery. For a deeper dive, check out this excellent external resource which offers a step-by-step guide to the risk management process.
Stage 1: Identification
You can't fix a problem you don't know exists. It’s that simple. The first stage is all about a no-holds-barred brainstorm to get every potential pitfall down on paper, no matter how tiny it seems. This needs to be a team sport—get everyone involved, from your artists and editors to the producers and account managers.
In a creative studio, risks can pop up from anywhere:
- Technical: A critical software plug-in gives up the ghost during a final render.
- Resource-Based: Your star VFX artist hands in their notice halfway through a crucial project.
- Client-Related: The client's feedback loop is painfully slow, putting key approvals on hold.
- External: A supplier for that special paper stock you need suddenly goes out of business.
The goal here isn't to find solutions just yet. It's to build a master list in a central document, which we call a Risk Register. This document becomes your single source of truth for everything risk-related.
Stage 2: Assessment
With your list of potential nightmares assembled, it's time to put each one under the microscope. This isn't about gut feelings; it's a structured look at two key things: probability (how likely is this to actually happen?) and impact (if it does happen, how much will it hurt?).
A simple scoring matrix works wonders here. Rate both probability and impact on a scale, say 1-5. A risk that scores high on both is obviously a much bigger beast than one with low scores across the board.
A common mistake is to treat every risk as an equal-threat emergency. Assessment helps you separate the minor headaches from the genuine project-killers, so you can focus your team's energy where it truly counts.
This approach strips the emotion out of it and gives you a clear, data-backed picture of where your project is most vulnerable. It helps you see which shadows are hiding the biggest monsters.
Stage 3: Prioritisation
Once your risks are scored, prioritising them is the next logical step. Your risk register should now be sorted with the highest-scoring threats sitting right at the top. These are the ones screaming for your immediate attention.
This is where risk management in projects becomes truly effective. No studio has unlimited time or resources to plan for every single what-if scenario. Prioritisation makes sure you’re spending your valuable time and budget tackling the risks that pose the biggest danger to your timeline, budget, and creative vision.
Stage 4: Mitigation
Alright, time to get proactive. This is where you decide what you're actually going to do about your top-priority risks. Generally, you’ve got four main ways to play it:
- Avoid: Reroute the project plan to dodge the risk entirely. If a brand-new, buggy piece of software is a risk, you might just stick with the reliable tools you already know and trust.
- Transfer: Hand off the financial hit of a risk to someone else. This is what insurance is for, but it could also mean outsourcing a particularly tricky part of the project to a specialist who contractually assumes the risk.
- Reduce: Take practical steps to lower the risk's probability or its impact. To reduce the risk of a server failing, you could schedule regular maintenance or set up a robust backup system.
- Accept: For some low-priority risks, the smartest move is to do nothing. You see the risk, you acknowledge it, but you accept the potential fallout because the cost of fighting it would be more than the damage it could cause.
Stage 5: Monitoring
Risk management is never "set it and forget it." Projects are messy and unpredictable. New risks will pop up, and old ones will change in importance. That's why you have to keep a constant watch.
Your risk register needs to be a living document, something you review in your regular team meetings. The person assigned to each risk is responsible for keeping an eye on it and flagging any changes. This also means watching out for project dependencies—a delay in one task can easily trigger a domino effect of new risks down the line. To get a better handle on this, have a look at our guide on what is a project dependency.
Stage 6: Reporting
Finally, clear communication is what holds this whole process together. Reporting is all about keeping stakeholders—your team and your clients—in the loop on the status of key risks.
This kind of transparency builds massive trust. When a client sees that you’re not only aware of potential problems but also have a plan for them, their confidence in your studio’s ability to deliver goes through the roof. A simple dashboard or a dedicated section in your weekly status report is a great way to show which risks you're tracking, which you're tackling, and which you've already beaten.
Essential Templates for Your Risk Management Toolkit
Theory is one thing, but actually managing risk on a project comes down to organised action. To get from vague worries to concrete plans, you need the right tools. Templates give you that structure, making sure your team is capturing the right details every time and turning what could be a mess of data into a clear roadmap.
Without these documents, your efforts can easily become scattered. Critical details get buried in email threads, accountability gets fuzzy, and things fall through the cracks. Let's walk through three core templates that form the backbone of any solid risk management process.
The flowchart below shows how the five stages of risk management flow into one another. It's a great reminder of how each step builds on the last.
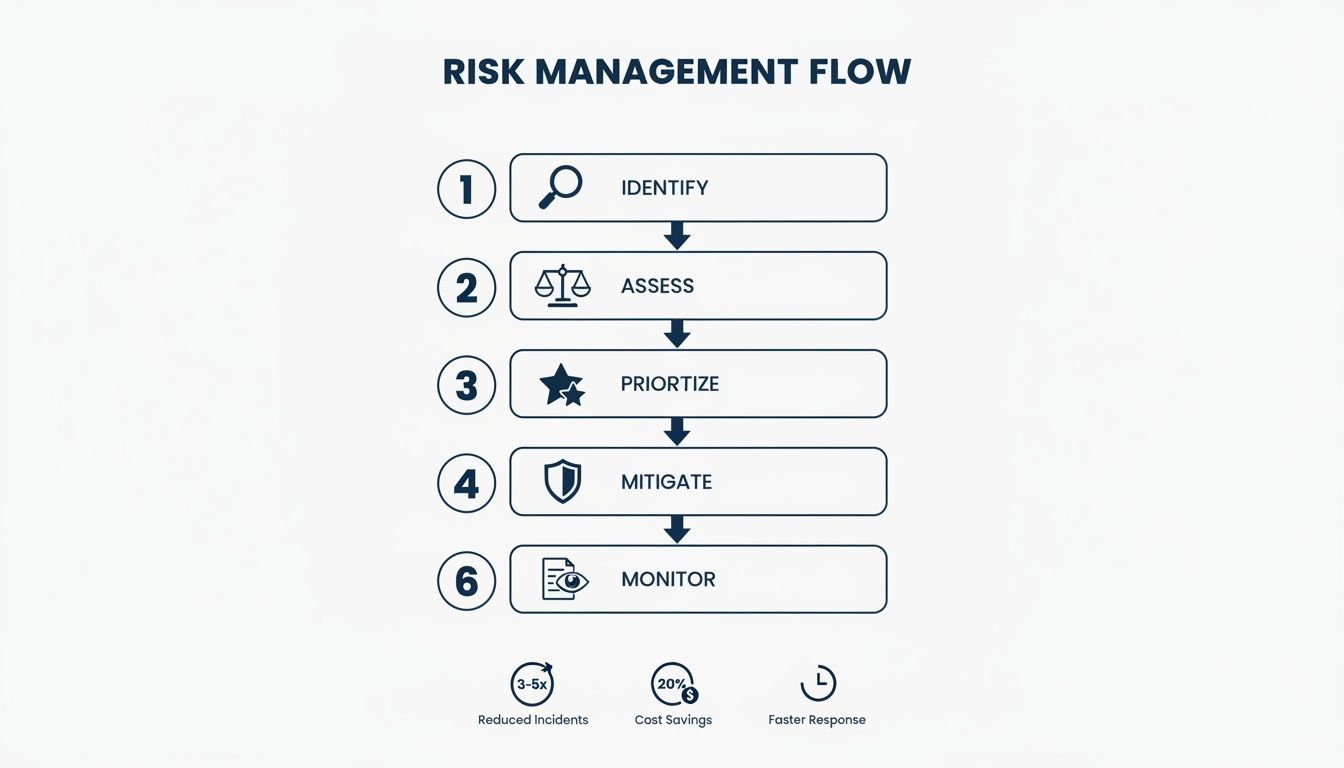
This visual drives home the point that risk management isn't a "one and done" task. It's a continuous cycle that needs attention from the moment you identify a risk all the way through to reporting on it.
The Risk Register
Think of the Risk Register as your project’s single source of truth for everything risk-related. It's a living document—usually a spreadsheet—that logs every potential threat your team uncovers. Its main job is to give anyone on the project an instant snapshot of where things stand with any given risk.
A good register is your best friend for tracking, monitoring, and communication. To make it genuinely useful, here’s a simple table outlining the essential columns your register should have.
Key Components of a Project Risk Register
| Column Name | Purpose and Description | Example Entry |
|---|---|---|
| Risk ID | A unique number for easy reference and discussion. | VFX-003 |
| Description | A clear, brief summary of what could go wrong. | Key VFX software licence expires mid-render farm phase. |
| Probability & Impact | Scores (e.g., 1-5) assigned during the assessment phase to help prioritise. | Probability: 4, Impact: 5 |
| Risk Owner | The one person responsible for monitoring the risk and its response plan. | Sarah Jenkins |
| Mitigation Status | The current state of the response plan. | In Progress |
This document isn’t just a gloomy list of everything that could go wrong. It’s a dynamic tool for accountability.
By assigning an owner to each risk, you ensure that someone is actively keeping an eye on it. This simple act of ownership prevents potential issues from being forgotten until it's too late.
The register will quickly become the main agenda for your risk review meetings, helping you focus discussions on the high-priority items that need action now. Proper documentation here also supports better financial management of the project, as it ties potential threats directly to their budget implications.
The RACI Chart
When it’s time to act on a mitigation plan, confusion over who does what can be a project killer. Who makes the final call? Who’s actually doing the work? A RACI Chart cuts through that ambiguity by clearly defining every team member's role for a specific task.
RACI is an acronym that breaks down responsibility:
- Responsible: The person (or people) who will actually do the task.
- Accountable: The one individual who owns the outcome and has the final say. There should only ever be one "A" per task.
- Consulted: The experts you need to get input from before moving forward.
- Informed: The people who just need to be kept in the loop on progress.
Imagine a high-stakes risk, like a lead animator resigning halfway through production. A RACI chart makes it crystal clear who is Responsible for finding a replacement, who is Accountable for the final hiring decision, and which department heads need to be Informed about the impact on the timeline. No guesswork needed.
The Mitigation Plan Template
While the risk register gives you the 30,000-foot view, a Mitigation Plan is your boots-on-the-ground document for tackling your most serious risks. It zooms in on a single, high-priority threat and outlines the specific steps, resources, and timeline needed to deal with it.
This template forces you to move beyond what the problem is and figure out how you're going to solve it. A good plan should always include:
- Risk Summary: A quick reminder of the risk being addressed.
- Mitigation Strategy: The approach you’ve chosen (e.g., Avoid, Reduce, Transfer).
- Action Steps: A step-by-step checklist of what needs to happen.
- Required Resources: Who, what, and how much budget you’ll need.
- Timeline: Clear deadlines for each action item.
For instance, if you're dealing with digital threats, documenting these steps is non-negotiable. Using a cybersecurity risk assessment template can help you structure your plan effectively and make sure you’ve covered all your bases. This focused approach ensures your response is well-thought-out, properly resourced, and ready to go.
Real-World Risk Scenarios in Creative Projects
Theory and templates are useful, but let’s be honest—risk management really clicks when you see it play out in the real world. To bring these ideas off the page, we'll walk through three classic scenarios that creative and post-production studios know all too well. Each one highlights a different kind of risk and shows how a bit of foresight could have turned a full-blown disaster into a manageable bump in the road.
Think of these less as cautionary tales and more as practical lessons in what to look out for.
The Spiralling Budget: Financial Risk
Picture this: a studio is deep into a high-profile animation project with a locked-in budget. Everything seems to be running smoothly. But two months in, the lead artist makes a case for a new, pricey software subscription, promising it’ll speed things up. The project manager, feeling the pressure to deliver, gives the green light without running the numbers.
Soon after, a wave of unexpected client revisions pushes two key team members into unplanned overtime for three weeks straight. Because no one is actively tracking the budget against actual costs, these expenses fly under the radar. By the time the monthly finance report comes out, it’s too late—the project is already 15% over budget, and there’s still a mountain of work to do. The studio's profit margin is shot, and the client relationship is on thin ice.
A solid risk management process would have flagged "unplanned software costs" and "scope creep leading to overtime" from day one. The mitigation plan could have been simple: a clear approval workflow for any new spending and a cap on overtime hours that would trigger a review. This would have raised a red flag early, giving the team a chance to course-correct before the damage was done.
The Critical Hardware Failure: Operational Risk
Here's another one. A post-production house is in the final 24-hour stretch of a major feature film’s colour grade and final render. The deadline is absolute—the film is slated for a festival premiere. Then, the worst happens. The main rendering server suffers a catastrophic hardware failure.
The team scrambles, but their backup system is old and hasn’t been tested in over a year. It takes hours just to get the project restored on a weaker machine, and the render speed is painfully slow. They miss the deadline. The client has to pull the film from the festival, leading to a massive blow to their reputation and bottom line.
This is a textbook operational risk. An effective risk management plan would have covered all the bases:
- Regularly scheduled maintenance and stress-testing for all mission-critical hardware.
- A fully redundant backup system that’s tested quarterly to make sure it’s ready to go.
- A documented contingency plan that spells out exactly who does what when the primary system fails.
The Damaged Relationship: Reputational Risk
Now, consider a VFX studio that promises a client a key deliverable by Friday. The compositing team wraps up their work on Wednesday, but due to a communication fumble, the quality control (QC) team doesn't get the memo until late Thursday. When they finally review the files, they spot minor errors that need fixing.
Because of the internal delay, the revised files aren't ready until Monday morning. The project manager, dreading a difficult chat, goes silent over the weekend. Left completely in the dark, the client is furious when the deliverable finally shows up late. A valuable, long-standing relationship is now seriously damaged. The problem wasn't the work itself; it was the breakdown in communication.
Proactive communication is one of the most powerful risk mitigation tools you have. A small problem shared early is a manageable issue. A small problem that’s hidden becomes a crisis of trust.
This kind of reputational damage is entirely avoidable with clear internal processes. Strong communication management for projects ensures handoffs are confirmed and stakeholders are kept in the loop—especially when there’s bad news. That transparency builds trust and turns a potential crisis into a moment for collaborative problem-solving, protecting client relationships for the long haul.
Using Technology to Proactively Manage Project Risk
Trying to track project risks with a spreadsheet is like playing a game of catch-up you can never win. It's purely reactive. Today’s project management platforms, however, are built to flip that script, turning risk management in projects from a passive chore into a proactive, automated system. It’s all about giving you the foresight to see trouble coming long before it ever touches your bottom line.
By weaving risk management directly into your day-to-day project workflows, your team can move faster and make smarter, data-driven decisions. This isn’t about adding another layer of bureaucracy. It’s about making the processes you already have more intelligent, so you’re not just documenting risks—you’re actively stamping them out with the tools you rely on every day.
Visualise and Mitigate Resource Bottlenecks
One of the biggest—and most common—operational risks in any creative studio is team burnout or misallocation. Overworking your best people is a fast track to costly mistakes and resignations, while letting key talent sit idle is a straight shot to a bleeding budget. Resource planning tools give you that crucial bird's-eye view of your entire team's capacity.
You can see in an instant who is overbooked and who has time to spare, letting you rebalance workloads before they snowball into a real problem. This visual approach helps you dodge the classic risk of a project derailing just because one critical person was stretched too thin. It’s a simple but incredibly effective way to protect your people and your projects.
The screenshot below from freispace shows how a central dashboard provides a clear overview of project health, timelines, and who’s working on what.

This kind of real-time visibility is what allows you to spot potential scheduling conflicts or resource crunches before they can escalate into something serious.
Identify Domino Effects with Gantt Charts
In creative projects, tasks are rarely islands. A small delay in one corner of the project—say, waiting on client feedback for a storyboard—can set off a chain reaction of delays down the line, knocking over everything from animation to the final sound mix. Your best defence against this domino effect is a Gantt chart.
By mapping out all the task dependencies, a Gantt chart shows you exactly how a single missed deadline ripples through the entire project timeline. If the VFX team can't start until the editing team finishes, you’ll see that link crystal clear. This lets you pinpoint risks along the critical path and build in buffers where they matter most, giving you a solid visual shield against schedule creep.
Using technology to map dependencies isn't just about planning; it's about understanding your project's vulnerabilities. It shows you precisely where a small fire could turn into a major blaze, allowing you to focus your mitigation efforts effectively.
Protect Your Budget with Real-Time Tracking
Financial risk is a constant shadow hanging over every project. Without real-time data, you're essentially flying blind, only discovering you’ve blown the budget when it’s far too late to do anything about it. This is a risk modern project management software is designed to tackle head-on.
Integrated time and expense tracking tools give you a live pulse on your project's financial health. At any given moment, you can see precisely how many hours have been logged and how much has been spent against your original estimates. This means you spot budget creep the second it starts, not weeks later in a finance meeting.
This immediate feedback loop empowers project managers to make proactive calls, such as:
- Adjusting the scope with the client before it's too late.
- Shifting resources to more cost-effective tasks.
- Spotting workflow inefficiencies before they drain the budget.
Use Automated Alerts to Stay Ahead
Finally, think of automation as your project’s early-warning system. Instead of someone having to manually check deadlines and budgets, you can set up automated alerts to flag when a project is nearing a critical point. These alerts can be configured for all sorts of risk indicators, like when a task hits 75% of its allotted budget or a key milestone is due in 48 hours.
This ensures nothing falls through the cracks. It gives your team the heads-up they need to step in and fix potential issues before they become full-blown crises. By using automation, you’re essentially embedding risk monitoring into your workflow, creating a safety net that protects your projects around the clock.
Common Questions About Project Risk Management
As you start weaving risk management in projects into your studio's day-to-day, a few practical questions are bound to pop up. Moving from theory to the real world is where the rubber meets the road, after all. This section tackles some of the most common queries we hear from studio leaders and project managers, with straight-up answers to help you get this stuff working smoothly.
Getting these details right can be the difference between a risk process that feels like a chore and one that becomes a genuine strategic advantage for your projects.
How Often Should We Review the Risk Register?
For active, fast-moving projects, a weekly or bi-weekly check-in on your risk register is the sweet spot. The trick is to keep these meetings ruthlessly efficient. They shouldn't be long, drawn-out sessions where you drone on, reading every single risk aloud.
Instead, your meetings should zero in on what’s changed or what needs immediate attention. This keeps the team engaged and shows you respect everyone’s time.
Here's how to run a quick, effective risk review:
- Focus on the Top Ten: Kick things off by discussing only the top 5-10 highest-priority risks. Have their scores changed? How are the mitigation plans coming along?
- Review New Risks: Carve out time to discuss any new risks that have cropped up since the last meeting. This is your moment to assess and prioritise them as a team.
- Check on "Near Misses": Briefly touch on any risks that have recently shifted in status, whether they’ve become more or less severe.
This tight agenda ensures your risk register stays a living, breathing document—not some static spreadsheet that’s already out of date the second you close it.
What Is the Difference Between a Risk and an Issue?
This is one of the most vital distinctions in project management, but it's amazing how often it gets muddled. Nailing this helps you point your team's energy in the right direction, focusing on prevention before you’re forced into firefighting mode.
Simply put, it all comes down to timing.
A risk is a potential problem that might happen in the future. An issue is a problem that is happening right now.
A risk is the possibility that your lead animator might resign mid-project. An issue is your lead animator actually handing in their notice. Your risk management plan is built to prepare for the possibility, so if it happens, you're not scrambling. Once that risk becomes a reality, it’s no longer a risk; it’s an active issue that needs to be dealt with, pronto.
Thinking this way helps you separate proactive planning (risk management) from reactive problem-solving (issue management).
How Can a Small Studio Implement Risk Management Without Bureaucracy?
The fear of getting tangled up in corporate-style red tape is a big reason why many smaller, agile studios avoid formal risk management altogether. But the process doesn’t have to be complicated to be effective. The goal is to get the benefits of foresight without the dead weight of bureaucracy.
You can easily scale the entire process to fit the size and speed of your studio. The aim is value, not paperwork.
Here are a few practical tips for a leaner approach:
- Simplify Your Templates: Your risk register doesn’t need twenty columns. Start with the absolute basics: a description, probability, impact, and an owner. That’s it.
- Focus on What Matters Most: Don't try to document every tiny thing that could possibly go wrong. Limit your focus to the top 5-10 most significant risks for any given project. This keeps the process manageable and makes sure you're tackling the stuff that can actually cause serious damage.
- Integrate, Don't Isolate: You don't need to add yet another hour-long meeting to everyone's calendar. Instead, bake risk discussions into the meetings you already have. Just dedicate 10 minutes of your weekly team huddle to a quick risk register review.
By keeping the process lightweight and weaving it into your existing workflows, you can build a culture of proactive thinking without slowing down the creative work that drives your studio forward.
Ready to move beyond spreadsheets and proactively manage your studio's projects with powerful, intuitive tools? freispace integrates resource planning, budget control, and real-time tracking to help you identify and mitigate risks before they impact your bottom line. Discover a smarter way to deliver projects on time and on budget by visiting https://freispace.com.